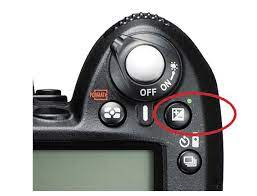
What is exposure compensation?
Exposure compensation can be found on your camera’s exposure control button. By dialling in exposure compensation, you can adjust the exposure of your image (to increase or decrease its brightness). Exposure compensation is usually referred to as using thirds of a stop like these: -1/3 or -2/3, 0. +1/3, +2/3, 0, +1/3 and +1.
In normal conditions, your camera will measure the scene’s brightness (i.e. meter from the scene) then input its calculated exposure settings.
Here’s the problem.
Your camera will not always do the right exposure. While I will get into details later, there are some situations where your camera’s exposure meter may fail. You can anticipate incorrect exposure values and adjust accordingly.
Exposure compensation: When is it appropriate?
Your camera’s meter may fail now and then.
Camera manufacturers have found that most scenes will average to a grey tone of middle grey. Your camera uses this 18% grey as an exposure benchmark. It analyzes the scene and then adjusts the exposure to match the grey value.
Both of these examples show the limitations of camera meters. But, you also can see the power and potential benefits of exposure compensation. The camera would underexpose the snow scene and expose the night scene too much, so I set up a stop for positive and negative exposure compensation and got the perfect final result.
The step-by-step guide to using exposure compensation
Exposure compensation is something you are familiar with. But how do you apply it? The details of your camera model will vary, but here is a step-by-step guide:
Step 1: Change the camera’s priority to Program, Shutter Priority or Aperture Priority.
Let’s get started:
Exposure compensation is not allowed if you shoot in Auto mode. It can also be prohibited when you shoot in Manual. You can’t use exposure compensation in the Auto mode because your camera chooses the exposure. In Manual mode, you have full control over all exposure variables.
You will need to change your mode dial to Program, Shutter Priority or Aperture Priority. The most popular model in Aperture Priority. It allows you to set the aperture and ISO of your lens while the camera calculates the shutter speed. However, Shutter Priority mode lets you adjust the shutter speed and ISO (while setting the aperture).
Step 2: Assess the scene and decide if there is any exposure compensation.
Setting exposure compensation is difficult because it involves determining the amount of compensation you will use.
You can add a stop or so of exposure compensation to very dark or light scenes. ).
If you have a scene with many tones, it is possible to experiment. After setting up exposure compensation, take a shot and look at the LCD to see the final image. You can look in the viewfinder on a mirrorless camera equipped with an EVF before pressing the shutter key! Also, you might check the histogram of your camera.
Step 3: Locate the +/- button on your camera and dial in the exposure compensation
Most cameras have a tiny +/- button that is specifically designed for exposure compensation.
Please find the button you want to press and then press it. You can then turn the main dial to adjust the exposure compensation value. Every click on the dial will change exposure settings by one-third of a stop.
Step 4: Shoot and then review
After you have dialled in the exposure compensation, take a shot. Next, review the exposure compensation on your LCD and check your histogram.
If your image is well-exposed, it’s great. You can keep taking shots as long as you don’t see any changes in the light.
You can adjust the exposure if you feel that the image is not well exposed.
After taking a photo, your camera will keep your exposure compensation value. Each shot will appear one stop brighter (or darker) until the exposure compensation value is reset to zero.
Exposure compensation and exposure variables
As I have already mentioned in this article, exposure compensation adjusts exposure settings to produce a brighter or darker result.
What exposure variables does it adjust? Is it able to change the aperture? Or the shutter speed? Or the ISO?
It all depends on what shooting mode you choose.
Pro tip: Consider bracketing your exposures
Bracketing refers to the practice of taking a photo that is slightly underexposed or overexposed for each scene. This is in addition to the “standard exposure”.
It is important to maximize exposure and prove very useful, especially when dealing with complicated scenes or a large dynamic range.
You can adjust exposure compensation manually by dialling in a stop for positive or negative exposure after every “standard” shot. Or, enable the Auto Exposure Bracketing feature on your camera to automatically adjust each shot’s exposure.
Bracketing is more than just an insurance policy. It can also be used to create high-dynamic range processing. This allows you to blend tones from multiple exposures to achieve the perfect result.
Final words: Exposure compensation
Being a great photographer requires that you take control of your exposure. That’s why exposure compensation is so important.
Give it a shot. You will be amazed at the results!


